This is my first time making a card with a Santoro Gorjuss girl stamp that Kelly sent me to work with, it's called Santoro - Gorjuss Girls Stamp - Summer Days. Actually, this month, Kelly at http://www.7kidscrafts.com/ is having a sale with the Docrafts Santoro Gorjuss Girls. It took me a little while to work on this image but it came alright in the end. I also tried out a new technique that I learned from Amy Young's at athousandsheetsofpaper.blogspot.com. The technique was the very first Walk Thru Wednesday theme on the 7 Kids Crafts Newsletter. This die overlay or "Eclipse Technique" is a pretty neat way to use words especially when you want to say a message but don't want the word to overshadow the image which is the focal point. I really loved trying that technique out and I think any person that loves handmade cards will especially appreciate.
On to my Gorjuss - Summer Days
I colored her up with Copic markers which Kelly has at the 7 Kids Crafts store
and one Spectrum Noir marker on Spectrum Noir Paper.
Ink to Stamp the image:
Memento Tuxedo Black
Copic colors used:
E000, E00, E11, R20, R30, R33
RV02, RV04, RV09
V06, V09, V12
Y15, Y23, Y26
Y14
Y32, R26, Y28
T0, T1
Spectrum Noir:
TN2
The embossing enamel on the sand is from Stampendous! Aged Ivory
The Hello die is from The Greeting Farm
and the rectangle die is from My Creative Time
The A Happy Hello stamp on the envelope is from
Gina K. Designs.
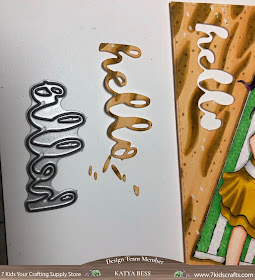
Here is some of the process photos I did to create this card.
Here I was trying to figure out a sentiment
and position, finally I picked a "hello" from The Greeting Farm
After cutting down the card layer with the large
rectangle die, I then cut the hello word die.
Make sure to save all of your little negative space
or colored bits, you'll need them later.
(See photo below)
I cut the "hello" die several times with white cardstock (all not shown)
then glued one down along with the little colored bits.
For more inspiration check out:
and the
Thank you so much for stopping by
Katya Bess


No comments:
Post a Comment
Please leave your comments to let me know you stopped by :)
I love comments, any type of tips or helpful/constructive criticism is always welcome. If there is something you'd like to see more of just ask. I would also love it if you followed my blog. Thank you for stopping by and have a colorful day.
-Katya