Thursday, December 6, 2018

LMMS: Christmas boy

Hello Crafty Friends!

I hope you are all having a beautiful day. For today's inspiration I have a card I created using Polka Dot Pals Eric and  Polka Dot Pals Add-on Faces (digital) both of these are digital stamps from Little Miss Muffet Stamps.

and  

Close-up

Polychromos color pencils I used were:
Ivory, Burnt Sienna, Burnt Umber, Medium Flesh,
Dark Flesh,Brown Ochre, Dark Cadmium Yellow, White,
Cold Grey III, Cold Grey VI, Black, Hooker's Green, 
Olive Green, Alizarin Crimson, Dark Red and Indian Red

For more inspiration from the Design Team and Guest Design Team
over at Little Miss Muffet Stamps check out the 

Thank you for stopping by,


Katya Bess 

Thursday, November 29, 2018

LMMS: Neva Jingle all the way

Good morning!

I hope you're all in good spirits. Today I have a jolly little card I've created with non-traditional Christmas colors. I used a rubber stamp and a clear stamp set from Little Miss Muffet Stamps. This rubber stamp is called Polka Dot Pals Neva and the clear stamp set is called Polka Dot Pals Add-on Faces
             Polka Dot Pals Add-on Faces              

Some of the Copic markers I used:
Outfit-
RV52, RV55, RV34
YG05, YG09, G16
BG45, BG49, BG78

Present-
Y08 and Y35
Y17, R29 and R24

Jingle bells
Y08, Y35 and a tiny bit of Y26

The die is from 
called Merry Christmas Ribbon (Elites)

The paper if from Doodlebug Design and it's called 
Christmas Town
The stars which are from the Doodlebug Design Chit Chat
also from Christmas Town and I added glossy accents for extra dimension.

That is all for now.


Thank you for stopping by

Katya Bess 

Friday, November 23, 2018

LMMS: Chrissie Let It Snow

Hello Crafty Friends!

I hope you've been having a lovely day/evening. It's almost that time again... Christmas time and some of us (me actually) don't have enough Christmas cards created! Yikes! Every year I grab a new Christmas cardstock or paperpad because I think I'll be working on Christmas cards all year long and then I don't get to make as many as I want. Luckily it's still November and have a chance to make cards for a few family members, some teachers and some of my crafty friends- I hope!

On to my card....
I started with a rubber stamp Polka Dot Pals Chrissie from
Little Miss Muffet Stamps and I also used Polka Dot Pals Add-on Faces clear stamp set
I had lots of fun coloring her up on Kraft colored cardstock- to me it gives her
a slight vintage look.
I colored her up with Copic markers and then went in with a few stores of
Polychromos colored pencils.


Some of the Copic colors I used were 
B32
R17, R46, R59
Y15, Y35, Y23, Y26, Y28, 
W9, W7, W5
YG63, G94
W3, W1
then I laid a little color pencil on top for lighting
Uni-ball Signo White Angelic for the snow and eye lights. 

For the colored layered background I used a die from
My Creative Time and the die for Let It Snow sentiment
is a die from Our Daily Bread Designs.

Here's a close-up
I really enjoyed making this card. 
I think I will make more in different colors- at least to practice.
I've been playing along with 
#thedailymarker30day coloring challenge and really enjoying it
especially with this card- I finished all of the coloring in one day.


Don't forget that there are Anything Goes challenges over at
There's also a sale going on at the shop various stamps

Thank you for stopping by,

Katya Bess
Entering card at:
Christmas Is Coming (#143)


Thursday, November 15, 2018

LMMS: Starbrite bookmark

Hello Crafty Friends,

Today I have a project for the new challenge over at Little Miss Muffet Stamps, I created a bookmark for my littlest one. Daenerys, will be 6 years next week and she's having so much fun learning and reading new words. It may be a while for her to read chapter books but she's extremely advanced and smart that I'm sure she'll be wanting more bookmarks made to read between school books and personal books. For the bookmark I used Polka Dot Pals Starbright. I colored her up with Copic markers and the blue part of the sky closest to her body is with Copic markers as well. The rest of the background was done with Distress Inks. The stars and dots were done with Sakura Stardust Gellyroll and the white stars were done with Uni-ball Sign White Angelic. 


I wanted to make her clothing very girly and colorful.
Luckily I had a twine/tassel with similar colors. I was looking
for my white and gold and saw this colorful twine and thought it would 
perfect for this bookmark.

Here's a close-up so  you can see a few of the spots with Sakura Gellyroll 
Stardust pen- it does look a little weird on the phone but in person
it looks very sparkly and more uniformed. 

I think what took the longest to color 
was the hair and ruffles. It was actually pretty pretty quick and easy to make.
My older daughter's friends are already asking for bookmarks from the last time I made her 
some bookmarks. 

That is all for now. 
Don't forget to visit the blog at
and you may also check out the Pinterest gallery at

Thank you for stopping by,

Katya Bess

Monday, October 22, 2018

LMMS: Festive Days

Hey Crafty Friends,

I hope you're having a great day! I'm here trying to stay warm and coloring away while I have laundry going... Thanks goodness for automatic washers and dryers. LOL For this week's inspiration card for  Little Miss Muffet Stamps I've created a card using Polka Dot Pals Renata and Polka Dot Faces Add-On Digital.  The background I drew in myself because I wanted to put PDP Renata in a more authentic and traditional setting for the folkloric dress she is wearing. I added more ric rac trim to her dress and there rest of the line work was with a Sakura Pigma Sensei 0.4 pen. The pencils I chose to color this image were all Polychromos.

                                                                   Polka Dot Pals Renata 
                                                        and Polka Dot Faces Add-On Digital.  
                     Last year I created a completely different looks with the same stamps. 
                                           If you'd like to check it out clic this link right here: 
                                       http://kattyxotica.blogspot.com/2017/11/la-catrina.html


Here is just a little Close-up


Don't forget to enter the challenges and 
for more inspiration make sure to go check out 
the rest of the DT work


Thank you for stopping by
Katya Bess


Monday, October 8, 2018

LMMS: This Little Light of Mine


Hello Crafty Friends,

I've been working on some Christmas cards... crossing my fingers that I don't run out this time. This is a simple card I created with Jr. Hatter Kit with the new Jr. Hatter Add-on Faces Set A (Digital.) I'm really loving all of the new faces to customize them all. To decorate the bottom portion of the card I used an accessory of Christmas string lights from the Holiday Truck set.


I colored her up with Polychromos color pencils:
Skin: Ivory, Walnut Brown, Burnt Sienna, Indian Red and Medium Flesh
Outfit: Alizarin Crimson, Middle Cadmium Red, Dark Red, Caput Mortuum
Hair: Black, Cold Grey VI, Cold Grey III and White
For the lights:
Alizarin Crimson, Dark Cadmium Yellow, Cobalt Turquoise,
Dark Cadmium Orange, Crimson and Emerald Green +
Olive Green Yellowish for the light wire sockets.
For the lights of the eyes I used a Uni-Ball Sign Pen Angelic White.
For the background Distress Ink: Mowed Lawn
The rectangle die is from My Creative Time.
The sentiment is a clear stamp from Some Odd Girl.


I hope you liked my simple card and don't forget
to check out the 

Thank you so much for visiting.

Katya Bess

Thursday, September 27, 2018

LMMS: Wicked Good Friend!

Hello and Welcome back to my blog.


For this week's Inspirational Thursday card for 
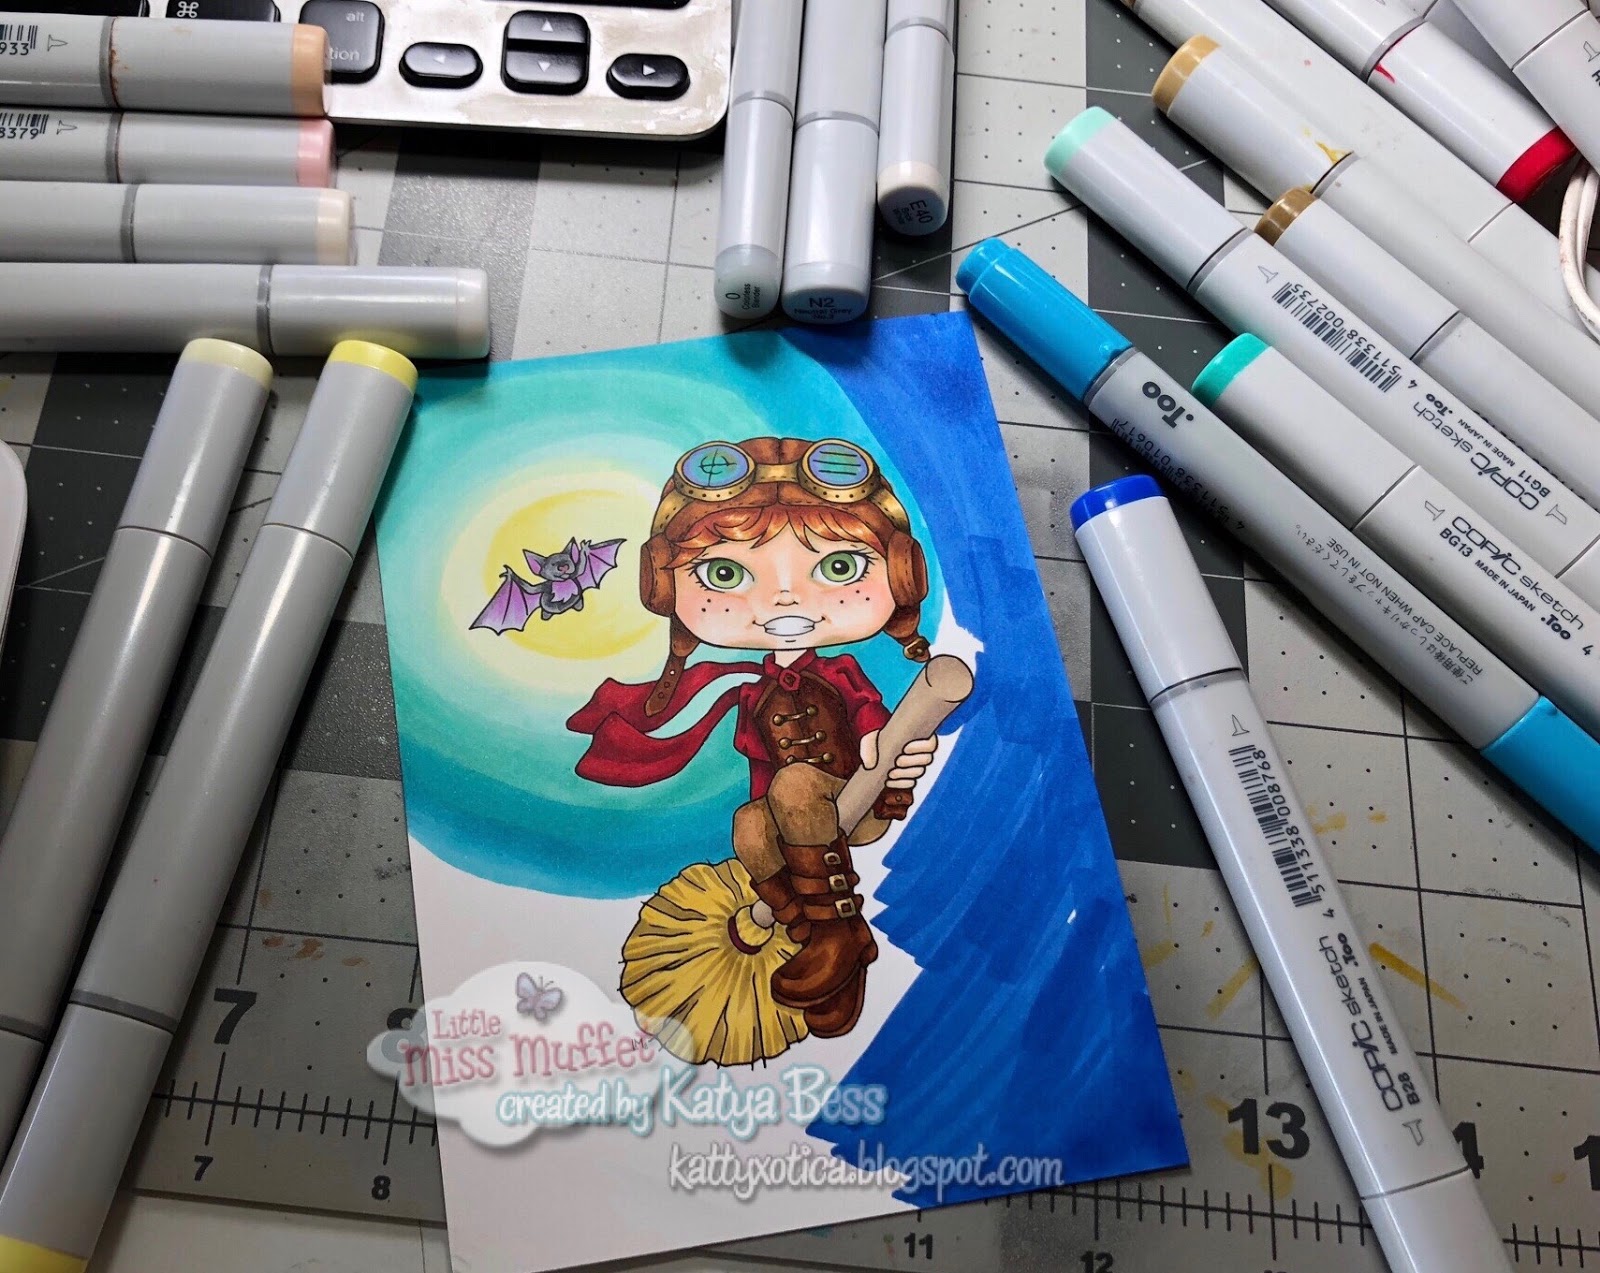
Little Miss Muffet Stamps. I used Polka Dot Pals Tamsin and a Polka Dot Pals Add-on Faces. I like that there's a twist on this little witch because she has some Steampunk Gear on. I think next time I create with this image I will work with a steampunk background as well- probably one of those cool ones from Make It Crafty. For now I just wanted to make it bright and a tad bit of a spooky night sky.


I used lots and lots of colors to create this card and had fun doing so.... that's some of my
crafty mess but too embarrassed to show my entire desk. LOL 

The odd thing this time is that I didn't complete the face and coloring first like I usually do.
I was a little bit hung up on the leather colors I wanted to use. I knew I wanted her to be a redhead though. I think you'll be proud of me this time 'cause I actually took note (pictures) of most the colors I used but I still typed the ones I didn't take a photo of. Usually I get into my coloring and don't write colors down. haha


The Copic Colors + 1 Polychromos Color Pencil I used:
Leather: E99, YR24 and E39
Blouse/Scarf: R29, R56, R39 and R46
Pants: E53, E84 and E55
At first I wanted to do some copper but I then changed my mind because
I thought it would conflict with her red hair and reddish brown leather. 
I went with a brass tone for her goggles, buttons/hardware.
Brass: Y23, Y26, Y28, E87 and E84
Lens: BG13, B63, BV13, V22 and YR23
Skin: E0000, B000, E21, E000 and E30 
Hair: E09, YR23 and YR27
Eyes: YG61, YG67, YG61 and YG00
Bat: V04, V06, V22, R56, N4 and N6
Broom:Y15, E84, E43,  E71, E42 and R39
Moon: Y00, Y15 and Y11
Night Sky: BG11, BG13, BG05 and B28
To create the clouds I scribbled the 0 Colorless Blender
Clouds: 0, B28, BG11, Y00 
and a Polychromos Color Pencil White.
and to create the spooky tree I use drew in some lines with N9
trees: N9

Here's a close-up 

I hope you liked my card,

Don't forget to check out the Little Miss Muffet Challenge Blog

Thank you for stopping by,


Katya Bess

Tuesday, September 18, 2018

LMMS: Hazel Thank you

Hello Crafty Friends!

I hope all is going great. Summer, my favorite season is coming to an end very quickly which for me means creating lots of Thank You, Winter or Christmas cards. For this card I used Polka Dot Pals Hazel with a Polka Dot Pals Add-on Faces, all I could think about was an Autumn theme where I sa when I saw this image.


The paper is from Doodlebug sde

          Here's a bit closer with better lighting.

Thank you for visiting!

Katya Bess


Thursday, August 30, 2018

LMMS: Ximena Felices Fiestas

Hello there! It's time for another Inspirational Thursday. This time I used 
When I saw this image I thought about celebrations there are in Central America
and in Mexico. Where women wear Folkloric dresses of many colors. Sometimes the
dresses are all white, sometimes white with some colorful access and sometimes bold
and bright colors- which I love personally.
I imagined this dancer in a parade on a cobblestone street so I used an embossing folder
from Cuttlebug/Provo Craft. I also used La La Land Crafts die to make de 
"papel picado" decorating above and behind her. 


I colored Polka Dot Pals Ximena with Polychromos color pencils on Kraft Cardstock and fussy cut around her. Then I used mounting foam to add dimension to the card. 


FaberCastell Polychromos color pencils (+1 Prismacolor) used:
Ivory, Walnut Brown, Burnt Siena, Burnt Ochre, Dark Flesh, Middle Cadnium Red and White.
Black, Cold Grey VI, Walnut Brown and White.
Light Cobalt Turquoise, Cobalt Blue, Middle Phthalo Blue,
Crimson, Mauve, Manganese Violet,
Orange Glaze, Light Cadnium Red,
Prismacolor Jasmine and Polychromos Dark Cadnium Yellow
Colors were used on Kraft Cardstock
to check out the other talented design team members 
as well as other LMMS members creations. 

Thank you for stopping by. 

Katya Bess

Monday, August 20, 2018

Once upon a time - Girl Power

Hey there Crafty Friends,

A few days ago my oldest daughter  Jade turned 11 years, she received some money for her birthday and of course one of the first things she wanted to buy was books. She purchased a hardcover book called "Mother Knows Best: A Tale of the Old Witch," from this little shop not too far from our home. The name of the shop is called The Bookworm and every time we passed by it she wanted to go but usually I had groceries or other errands so I finally took her and she was so happy to just be there. I made her a bookmark since she loves reading and we have to make her stop reading to go eat or to work on her homework or do chores... (lol is that making me sound like Mother Gothel?)
I really love the images on this set because they show skinny girls like my daughter Jade but I really love the sentiments too. You can find Girl Power clear stamp set from Kraftin' Kimmie here: Girl Power!

Colored the entire image with Copic markers
added flat star sequins my Mom gave me with a tiny bit of glue
before I ran it through my Scotch laminator.  I punched a hole
on the top in case she wanted to add ribbon or some other charm.

Here is a close-up of the bookmark.


Here are 3/4 of my kids on the side of The Bookworm store window.
I thought this window art was really cool so I had to take a photo.

I hope you liked my bookmark,
my daughter really likes it and I'm happy about that.

Thank you so much for visiting.

Katya Bess 

Thursday, August 16, 2018

LMMS: The Bookworm

Hello and Happy Thursday!


For many, school has begun. My kids started the new school year on August 6th. Felt like a really short summer break, especially when I went to school- it didn't start until after Labor Day in September. heehee 
I had started to customize the hair on this cutie from 
http://www.littlemissmuffetstamps.com/ her name is Polka Dot Pals Lirienne - it's a rubber stamp and she's currently on sale! I also used clear stamp Polka Dot Pals Add-on Faces and this set is on sale as well. 


After I inked un my stamp, I carefully tried to remove some of the ink from the hair area.
I wanted the hair area to be light almost like "no-lines coloring," so I can customize and make it 
into curly hair and I tried to not mess with the hair barrettes. 


When I used the clear stamp Polka Dot Pals Add-on Faces I didn't line  up the eye holes like
normally because I wanted her to look like she was actually reading. I wanted her to look like she's looking down at the pages of her book. To do this you just line up the Polka Dot Pals Add-on Faces of your choice slightly above the area you normally would. I then darkened the eyelashes and pupuls with a Black Copic Multiliner pen. (With permission) I customized and worked on squiggly and curly lines following Barbara Sproatmeyer's artist lines. So I tried not to change the hairstyle nor the flow of the hair- I did add some bits of fly-away hairs.

Here is the image before deciding on the color of the book.

Here it is all finished ready to give to my daughter.

Don't forget to join the Facebook page
and check out the other creative teammates and customers on the challenge blog at

Thank you so much for visiting my blog.

Don't forget about the current sale.

I hope you enjoyed the card. 


Until next time,


Katya Bess

Thursday, August 9, 2018

LMMS: Happy Birthday Tabitha

Hello Crafty Friends,

Happy Thursday!

I've been having a little fun coloring this this digi stamp from http://www.littlemissmuffetstamps.com/  called Polka Dot Pals Tabitha and using one of the versatile Polka Dot Pals Add-on Faces clear stamps. Polka Dot Pals Tabitha has this super cute short curly hair and a cute little tutu and she's all ready for a birthday party. As you can see below, I used a lot of colors. I wanted a very colorful and happy card. I chose the colors of her clothing using colors I thought went well with the Doodlebug Design 6x6 papers called Fairy Tales. 


Here is my completed card using 


Here is a close-up


These are the colors I used for the clothing, wings and birthday hat.
I  tend to make swatches next to the image I'm coloring, 
If I don't I usually don't remember what colors I used.

Here is the full list of my Copic colors used. 
Hair: C9, C7 and a tiny bit of E29
Eyes: C1, C3, E27, E17, Y26, E15 Uni-ball Signo Angelic White
Skin: E11, E17, E13, E11, R22 and E04 
Clothing/Wings/Party Hat: BG05, BG07, Y11, Y17, Y35, YR04, 
YR07, YG07, YG17, V20, V22, V15, V25, RV06, RV09
Woooo! That was a lot of colors but I really enjoy coloring so
it doesn't feel like a lot of colors when I'm having a good time doing so...
It just takes a little longer.

Here is the inside which was just fussy cutting part 
of one of the Doodlebug Design paper.


I hope you enjoyed my card. I hope you can check out all of the 
other cards created by all of the lovely and creative ladies over at:
http://littlemissmuffetchallenges.blogspot.com/

or check out the Facebook page:


Katya Bess

Friday, August 3, 2018

Life With You Is A Fairytale!


Hey There! Just worked on a card with rubber stamp set image from Kraftin' Kimmie called 
Princess Petunia. I really enjoyed coloring this stamp again. I have all of these retired stamps and
had only added the cling backing but hadn't organized them. Last week I was kind of sick so I made sleeves for a bunch of my loose Kraftin' Kimmie stamps. I used this month's sketch and the theme for this week too. 

I had a little difficulty with my lighting. Usually I can get away with the sun outside
but this time I kept getting a weird tone so I added the picture from inside as well before the card was done. 

I liked how the colors pop here more. 

I colored her up with my Polychromos colored pencils. 


Thank you for stopping by,

Katya Bess

Will enter my card at:

Thursday, July 19, 2018

LMMS: Polka Dot Pals Kyree

Hello there!

Here's a cute little image I've colored before, it's Polka Dot Pals Kyree and a Polka Dot Pals Add-On FacesPDP Kyree is so much fun to color especially fun to create a card just for fun and for birthday cards. The sentiment I used is Better Than Ice Cream Sentiment and it's just $1.00 in the http://www.littlemissmuffetstamps.com/ right now.


I colored PDP Kyree with Copic Markers
and the background sky was done with Distress Inks


Here is a little of the process...
I picked out papers from the Recollections paper pad called
Pool-Riffic

Here is are the colors I chose for her outfit
and the ice cream flavors

 These are the colors I chose for the grass.


I hope you liked the card. 

Thank you so much for visiting.


Katya Bess

Wednesday, July 18, 2018

Kraftin' Kimmie: Do I Like Coffee?

Hello Everyone,

It's been a while since I just sat to color or focus on making a card. Here is what I have created this week. I used a retired stamp from http://www.kraftinkimmiestamps.com/ her name is Angie and  Coffee & Friends! set for the sentiment. I can't believe it's retired!!! I will surely miss Annie Rodrigue's new releases at Kraftin' Kimmie- she is definitely one of my favorite artists. Anyway, I used marker paper and I wanted to experiment using colored pencils on marker paper to see how it looked. I'm still not sure how I feel about it, so I I only colored the skin and hair with pencils and then I colored the clothing with Copic markers. I stamped the same image on a Scrapbook paper I trimmed down from Michaels, it's called Garden Party from Craft Smart. I then fussy cut the image I colored and carefully glued her on top with some Glossy Accents.

Here is my completed card

I colored her up and fussy cut her and glued her on top of the 
uncolored image since I can't colored directly on the Design Paper
and I knew I was goin to loose some of the curly hair. 


Here are the Copic Colored I used:

Here is a close up of Angie.


Thank you for stopping by.


Katya Bess