Monday, December 16, 2019

7 Kids Crafts: Christmas Pine Fairy

Hello Everyone!

Just sharing another card from Christmas Fairy Release by Sweet November Digital Stamps. i am using Christmas Pine Fairy again. I colored her up with Copic markers and and little bit of Polychromos for shading/molding the facial features. For the wings I used Spectrum Noir Sparkle brush pend and Uni-ball Signo Sparkling Gold. The background rubber stamp is from Purple Onion to add to the Recollections: Christmas NOEL Say Freeze paper. The sentiment is also from a Recollections: Christmas NOEL stamp set. I also added gold with the Uniball Signo Sparkling Gold.

There are in the four pretty little Christmas fairies that were released for you all to enjoy. You can find them here:

Christmas Pine Fairy
Christmas Holly Fairy
Christmas Mistletoe Fairy
Christmas Poinsettia Fairy
and if you missed this month's Freebie stamp you can still purchase it here: Jingle


Here's a little excerpt from the Sweet November team about Pine Fairy:

"Some say that Pine Fairy coined the term 'rustic elegance'. She is all about finding the beauty in natural elements when it comes time to decorate for the holidays. From pine cone wreaths bathed in the glow of bees wax candles to the classic Christmas tree decked out with nuts and winter berries, she knows that Christmas doesn't have to be bright and flashy to be beautiful."


I hope that you like the card and hope that you can play along for the month of December at the 
7 Kids Customers Create! Facebook page

You can also share all of your creations you've done from
items Kelly carries in her store. 
Thank you so much for stopping by. 


Katya Bess

Sunday, December 8, 2019

7 Kids Crafts: Compliments of the season

Hello Crafty Friends,

I am excited to share this card. I really enjoyed coloring this beautiful Christmas Mistletoe Fairy and wanted to create a special card with her. After racking my brain for a few days I decided I wanted to do a little mixed media. I don't do too much mixed media and it looked a little different in my mind than it came out but I actually really love results. I think it has been almost a year since I have done a little mixed media but the process is very relaxing. The process takes me longer, especially drying time but most things I complete by sections anyway so it wasn't too much of an issue. For the background I wanted a certain snowy scene from the Prima marketing paper but I also fussy cut a barn and added it to the scene, then I added falling snow with gesso.

To create this card I used: Christmas Misletoe Fairy by Sweet November StampsPrima Marketing paper pad called Christmas in the Country, Nuvo Crystal Drops: Metallic - Soft Mint for the mistletoe berries and Nuvo Glitter Drops: Holiday Cheer for the holly berries, Hello Bluebird: Holly and Pine DieElizabeth Craft Designs: Garden Notes - Heart Grapevine WreathC.C. Designs: Mistletoe ATS028 and a little white gesso for snow on the tips of the pine needles, pine cone, snow falling and on the wreath. Oh yea on last thing I added some Spectrum Noir: Clear Sparkle pen over the wings.

Here's a little excerpt from the Sweet November Digital Stamps team about Christmas Mistletoe Fairy : And last but not least we have Mistletoe Fairy. This sweet fairy knows that it doesn't matter how a home is decorated for the holidays because as long is it is filled with love and laughter it is the most beautiful place in the world to be no matter the time of year.


Here's a little close-up of the dies I used


I Hope you can see that I added Spectrum Noir: Sparkle pen to the wings
and white gesso for the snow falling. 

Don't forget to check out the other beautifully drawn digis for this month:
and if you missed this month's Freebie stamp you can still purchase it here: Jingle

I hope that you like the card and hope that you can play along for the month of December at the 
7 Kids Customers Create! Facebook page

You can also share all of your creations you've done from

items Kelly carries in her store. 
Thank you so much for stopping by. 
Katya Bess


Thursday, December 5, 2019

7 Kids Crafts: Snowy Christmas Blessings

Hello Everyone!

Welcome to the Christmas Fairy Release week by Sweet November Digital Stamps. I am excited to share the card I made today using:  Christmas Pine Fairy. I colored her up with Copic markers and and little bit of Polychromos for shading/molding the facial features. For the wings I used Spectrum Noir Sparkle brush pend and Uni-ball Signo Sparkling Gold. The die set is by Hello Bluebird and it's Snowy Sky Scene die. I used Distress Oxides for the background.


There are in the four pretty little Christmas fairies that were released for you all to enjoy. You can find them here:

Christmas Pine Fairy
Christmas Holly Fairy
Christmas Mistletoe Fairy
Christmas Poinsettia Fairy
and if you missed this month's Freebie stamp you can still purchase it here: Jingle


Here's a little excerpt from the Sweet November team about Pine Fairy:

"Some say that Pine Fairy coined the term 'rustic elegance'. She is all about finding the beauty in natural elements when it comes time to decorate for the holidays. From pine cone wreaths bathed in the glow of bees wax candles to the classic Christmas tree decked out with nuts and winter berries, she knows that Christmas doesn't have to be bright and flashy to be beautiful."


She does look very elegant and reminded me of those High School Senior portraits we take
for the yearbook. heehee
So I enlarged her and cropped her so I can give her more details on the face. 

Here I had to tilt the card and changed the lighting again so you can see her 
shimmery wings and embossed stamp from 
Our Daily Bread Designs. 

I hope that you like the card and hope that you can play along for the month of December at the 
7 Kids Customers Create! Facebook page

You can also share all of your creations you've done from
items Kelly carries in her store. 
Thank you so much for stopping by. 
Katya Bess

Tuesday, November 26, 2019

7 Kids Crafts: Know What's Better Than Christmas Cookies

Hello Everyone!

I hope you're off to a great week. Just wanted to share this card I made using Noe Bundle by Sweet November Digital Stamps. This image I started coloring for Day 24 of #TheDailyMarker30Day challenge. It's a really cute image and I used both Copic markers and Polychromos pencils to for shading. The tray of cutout cookies are actually from Mrs. Claus Bundle. For a mega pop of bright and cheery to the background, I masked the image and then used a dauber to create a texturized look with Distress Ink: Mustard Seed. See Bright and fun. I made this into a long card or what some call a slim line card but I like to think of it as a money card. Heehee

Oh yea, also just to let you know that 7 Kids Crafts is having an early Black Friday sale. 30% off store wide (excludes: New Arrivals, Pre-orders and digital stamps) 
For 30% off use code: BLACKFRIDAY30

The sentiment I created myself on my computer.

The inside says: Christmas Dough 

Copic colors:
E0000, E000, E11, E21
Y06, Y15, YG23, YF25, YG17
RV25, RV29, RV66
N0, N2
W9, W7, W5, E59, E79
RV13
Polychromos pencils:
Grass Green, Permanent Green, Fuchsia, Bistre

For the sprinkles on the cookies I added
Nuvo Crystal Drops: Gloss - Simply White

For 30% off use code: BLACKFRIDAY30 
(excludes: New Arrivals, Pre-orders and digital stamps)


I hope that you like the card and hope that you can play along for the month of November at the 
Thank you so much for stopping by. 
Katya Bess

Tuesday, November 19, 2019

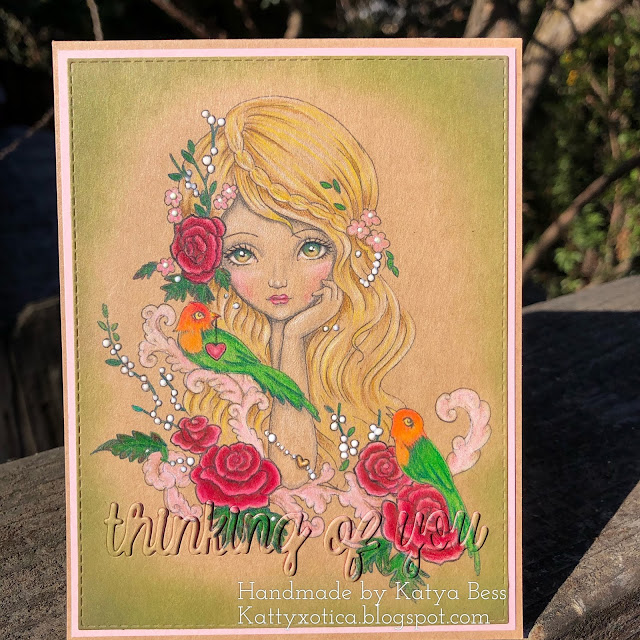
Thinking of You

Hello Crafty Friends,

I hope you are all doing well. I have a friend named BreAnn, who had a birthday in Heaven this month. When this time of the year comes around I always seem to think of her mother. I never know just what to say but this time I am sending her a card. I know that this month in particular BreAnn, her family and friends always showed awareness for Pulmonary Hypertension. The PHA or Pulmonary Hypertension Awareness ribbon is Periwinkle but for some reason I had the inspiration to color the roses red and small flowers pink. I will definitely work on cards with Periwinkle or another purpley color for PHA.


I decided to use  a digi stamp called: Ching-Chou Kuik - Love Birds and colored it up with Polychromos and a couple of Prismacolor pencils. To embellish and add dimension to the the image I used Nuvo Crystal Drops. I also used a die set from Sizzix Thinlits by Stephanie Bernard #661116 I purchased the word dies on Amazon but I'm sure you can probably find it in different craft stores. I used the words "thinking," "of," and "you." The technique I used to not have to crop off or cover my image is called Eclipse Technique and I learned that from Amy Young.


Thank you so much for visiting.

Sunday, November 17, 2019

7 Kids Crafts: Midnight Snacks

Hello Sweet Crafty Friends,


Just sharing a card with these sweet little kittens by Sweet November Stamps. This little mischievous kitten is named Midnight and in the different scenes you'll see him or her up no good until nap time. There are two special bundle deals that end tonight Midnights Christmas Bundle and Angel Babies Trio The images will be open until Saturday November 23.


I made a card based on the kitties so here's a little excerpt from Sweet November:

Up at the North Pole in Santa's Christmas village, Mrs. Claus has a new furry friend to keep her company during Santa's busy day away. It may seem strange to name a snow white kitten Midnight, but being at the top of the world they see their share of midnight sunshine and Mrs. Claus has always had a sense of humor. And Midnight is quite mischievous, keeping Mrs. Claus and all those elves on their toes.
They can't forget to hang the fragile glass ornaments higher on the trees otherwise Midnight is right there to bat and swat at the entertaining baubles until they fall and break. Oh and don't' even think about leaving wrapped packages out before Christmas eve because Midnight will waste no time tearing into those pretty papers just to play with the ribbons and hide inside the boxes. When she works up an appetite, Midnight will sneak into the kitchen looking for Santa's plate of cookies and glass of milk to pilfer. She may try to be careful but you just know that that milk will be all over the table before you can bat an eye. And when she finally gets a bit sleepy, Midnight heads into the bedroom but it isn't the bed she is looking for... nope, only one of Santa's extra hats will do for her to curl up and cat nap on.
Despite all the trouble she gets into everyone in the workshop loves and adores this little Christmas kitty.
The images I used are Midnight's Cookies and Midnight's Ornaments. I created the simple background myself and I even added some cat scratches on the wall paper for some added naughtiness. The sentiment I created myself from a sentiment I saw online which I thought is something a kitten might say to it's kitten friend or sibling. heehee I made it into a long card so I can add a monetary gift to the card. My son and his best friend love cats and pretend to be cats when the are in class... those silly boys. Also, my son's best friend has been saving for a big Lego set and we hope that a little cash help him out. 
Okay on to the card.
I colored the image with Copic markers and added just a little bit of
gold with my uni-ball Signo pen. 
I hope that you like the card and hope that you can play along for the month of November at the 
Thank you so much for stopping by. 
Katya Bess

Tuesday, November 12, 2019

7 Kids Crafts: Bundled Buddies

Hello Crafty Friends

Happy Veterans Day! Today!

I wanted to share a card using this cute clear stamp set called Bundled Buddies by Penny Black. Many of the Penny Black are so cute but I especially love working with the images drawn by Mo Manning. This stamp can be used as a Christmas card but also as a Autumn/Fall or a Winter card.
Time I put this bundle cutie in an autumn colors setting using the Hello Bluebird - Winter Woods Overlay die and I copic colored in some lines to make them look like birch trees. The leaves are left over from my previous project and that die is also from Hello Bluebird - Oak Tree Scene Die which I colored with ColorCraft Brusho powder pigments.

I really enjoyed creating this autumn scene and I hope that you get a chance to grab these from the 7 Kids Crafts store and have some play time as well.


I created this card using the stamp I colored for 
Day#12 of The Daily Marker 30 Day coloring challenge. 
I colored this cutie up with Copic markers.

The background was created with Distress Oxides
and the front overlay I colored with Copic markers.

Don't forget to join us at:
for exclusive stamps, freebies, games, live tutorials
and lots more fun! 

Thank you so much for stopping by.

Katya Bess

Monday, November 11, 2019

Thank You FOR EVERYTHING

Hello Crafty Friends,

I hope you're having a lovely day.  I had a lovely early morning working on the coloring for the background of this little scene using ColourCraft Brusho pigment powders. For the tree and leaves the main color I used is: Gamboge, then a little bit of Leaf Green and a tiny bit of Scarlet. I really love the effects that the Brusho creates and I purchased them for foliage and backgrounds in mind. Next, although not in the 7 Kids Craft Store, Kelly the owner carries a lot of Hello Bluebird items, especially the newer releases. The die set is called Oak Tree Scene Die and the stamp set I used is called Fall Friends.


I used Copic markes to color the critters and the pumpkins. 
For the sentiment I used a gold tinsel embossing powder 
from Recollections that I found at Michael's. 

Here's a little bit of how it looked when I finished coloring in the tree
and adding Brusho to the leaves. To color the grass and the tree trunk
I used Spectrum Noir marker because they are a bit juicier.

Thank you so much for stopping by.

Katya Bess

Saturday, November 2, 2019

7 Kids Crafts: Special Delivery

Hello Crafty Friends,

I hope you're having a wonderful Saturday and enjoying the new Sweet November Stamps release over at 7 Kids Crafts. There are several new stamps for the month of November. Today is the last day for the special bundle: Very Merrwee Christmas Bundle or you can by them singularly

Here are all of the new stamps:
Santa Bundle
Dancer and Dasher Bundle
Mrs. Claus Bundle
Ming Ming Bundle
Gingerbread House
Noe Bundle


I used Ming Ming Bundle and Noe Bundle. Here's a little excerpt about them: The Noe elf bundle includes the cheeriest little girl elf along with a festive gift bag and the handmade Christmas card that she has made for someone special. The Ming Ming elf bundle includes this happy little boy elf and two wrapped gifts that he is excited to add to Santa's sleigh.

As I was setting them up I knew I wanted them to carry a great big present that was ready to be put into Santa's big sleigh... I wonder who has a huge order of crafty goodies in that pretty present. 


Here is a close-up of: Noe Bundle
I added little eyelashes to make Noe into a girl elf LOL guess 
I wasn't paying attention to the names when I colored them up. 

and here's a close-up of: Ming Ming Bundle


Don't forget to join us at:
for exclusive stamps, freebies, games, live tutorials
and lots more fun!

Thank you so much for stopping by.

Katya Bess

Tuesday, October 29, 2019

7 Kids Crafts: Gingy have a holly jolly Christmas

Hello Crafty Friends!

Last week over at 7 Kids Crafts there was a vault release with sweet Gingy. There were 5 images in total.

For today's card I used Gingy with Popcorn by Sweet November Stamps. I colored him up with Polychromos pencils and I used both a soft and burnishing techniques depending on the area I was coloring. I used an older Hello Bluebird sentiment from the Typed Christmas sentiment set. I stamped the sentiment with VersaFine Clair: Nocturne.

I loved coloring and giving little Gingy a background setting for his little popcorn and holly berry garland. I started with some big pine tree needles to emphasize on Gingy's small stature. Then I sort of filled in the background with a big Christmas tree skirt. Then added a dark wood floor, white baseboard and a creamy yellow wall. To add some shine to the frosting and holly berries, I added glossy accents and let dry overnight before cropping down with the rectangle die by My Creative Time.


I hope you get a chance to play with theses cute little Gingys if you grabbed them

Don't forget to join us at:
for exclusive stamps, freebies, games, live tutorials
and lots more fun! 

Thank you so much for stopping by.

Katya Bess


Sunday, October 20, 2019

7 Kids Crafts: Gingy You're So Sweet

Hello Crafty Friends,

Welcome the vault week release. Usually the vault images are only available for one week. The Sweet November crew decided to bring back several Gingy digis for you to enjoy. The bundle deal is available for 2 days and today is the last day to get that special price.

Here is the bundle deal: Vault Gindy Bundle Deal there are 5 images in the set, you can buy the bundle deal or  you can buy them singularly.

Gingy with Gum Drops
Gingy with Candy Canes
Gingy with Popcorn
Gingy with Icing bag
Gingy with Rolling Pin

I used Gingy with Gum Drops  and here is a little exerpt about about him by Amy Young:

"While Santa is in the workshop overseeing toy production for the upcoming holiday season, Mrs. Claus is busy baking up all sorts of sweet treats in the kitchen. And she's not alone, she's got help from Gingy, the sweet little gingerbread man brought to life by Christmas magic. Gingy has been sorting the biggest and best of the gumdrops for the special gingerbread house that he and Mrs. Claus have been putting together."


To color him up I used Polychromos pencils + 1 Prismacolor. The background I used Distress Oxides and Colorbox Frost White to create the snow. 


I hope that you like my card and are able to snag that Vault Gindy Bundle Deal by tonight. 


Don't forget to join us at:
for exclusive stamps, freebies, games, live tutorials
and lots more fun! 

Thank you so much for stopping by.

Katya Bess
Saturday, October 12, 2019

7 Kids Crafts: Monsters Only

Hello Crafty Friends,

I had used this stamp on my previous post here: Dreaming of a White Christmas and I got so many questions about the coloring that I decided to do a facebook live with it even though I don't think I'm an expert at color pencils at all. You can check out the live here if you have time: Katya's Facebook Live at 7 Kids Customer's Create using Beaming elf. Kelly has ordered more of this cute elf from Penny Black and you'll be able to color him up too when it's restocked. During my live coloring I had a crafty friend, Sheila Fisher said she was planning to use him with Halloween colors. I thought this little elf colored in Halloween colors was a brilliant idea and after the live I had to ask her if it was okay to use that idea and she said yes. Yay! The first thing I thought was to color him up in green skin to make him into a little cute goblin and give him candy corn colored stripes. haha

The colors are listed below.

The Doodlebug papers are still in the shop and you can find them here:
Doodlebug Designs- 6x6 pad Candy Carnival

The banner and the sentiment which are all part of a 90 piece die cut set are available here:
Doodlebug Designs - Chit Chat Die Cuts - Candy Carnival
(note: I did trim the white from the banners/pennant.)


Beaming - Penny Black


Polychromos used:
Permanent Green, Deep Cobalt Green, Cadmium Yellow, White, Walnut Brown,
Cold Grey III, Rose Carmine, Burnt Ochre, Black,
Orange Glaze, Light Cadmium Red, Purple Violet, Mauve

Memento Dual Marker: Tuxedo Black

Don't forget to join us at:
for exclusive stamps, freebies, games, live tutorials
and lots more fun! 

Thank you so much for stopping by.

Katya Bess

Monday, October 7, 2019

7 Kids Crafts: I'm Dreaming of a Bright Christmas

Hello Crafty Friends,


I wanted to share this cute little elf called Beaming, (back in stock) by Penny Black. There are still more cute Christmas Penny Black clear stamps available at 7 Kids Crafts store. I colored image with color pencils. I wanted to keep the card clean and simple so I didn't add much to the background. I also wanted to light up the Christmas lights by plugging them into an outlet so I drew it in just for fun.

I did a live tutorial on how I colored up this image... 
well it was a second card but same technique and same colors were applied. 
Facebook live coloring elf Beaming from Penny Black
to view the video you must be a member of the 7 Kids Crafts Customer's Create facebook group.


I had so much fun coloring up this cutie. 

Color pencils used:
Polychromos and a few Prismacolor)
Deep Cobalt, Permanent Green, Walnut Brown, Burnt Ochre,
(Prismacolor: Eggshell), Sienna Brown, White), 
Rose Carmine, Alizarin Crimson, Dark Red, Cold Grey III, 
Cadmium Yellow, Light  Phthalo Blue, Black


Don't forget to join us at:
for exclusive stamps, freebies, games, live tutorials
and lots more fun! 

Thank you so much for stopping by.

Katya Bess

Saturday, October 5, 2019

7 Kids Crafts: Love Potion

Hello Everyone!

Happy World Cardmaking Day!

There is a new release this month by Sweet November Stamps at 7 Kids Crafts store.

Wraith Willamina Set
Saoirse The Seer Set
Vampress Mircea Set

The potions are from the Saoirse The Seer Set  here's a little excerpt about it:
Saoirse the Seer may appear to be a wandering gypsy, traveling the countryside in her colorful wagon. But think twice before asking her for an innocent palm reading or a look at your tarot cards because Saoirse's skills are far beyond such trivial fancies. With a magic hand she deftly brews potions that can bend a person's will or alter them in unimaginable ways. And when she gazes into her crystal ball she can see things you may not be ready to know.

For my card I wanted to focus on the just the potions from the Saoirse The Seer Set. I used a window with a ledge from The Brownie Hole Accessories and the spider web is from Bundle Agatha, Ariadne and her Spiderweb to show that some of these potions have been untouched for a long time.

The stone background I just drew in myself as well as the background behind the glass window. I wanted the scene to be a day scene so  you can see the transparency of the glass bottles and potions. Oh yea, I also put the transparency around 40 percent so you can see through the potion bottles as well. I found the potion sentiment online and I liked it because it felt like some kind of twisted romance going on with the person that's "in love." I colored the entire image with Copic markers
and when I was done I used glossy accents to emphasize on the the glass potion bottles.


It had to take photos from at a slight angle because it was hard to see the pretty spiderweb that I went over with Sakura gellyroll Clearstar and 
also the gloss effect from the Glossy Accents on the potion bottles. 

I used all of these Copic markers
I know seems like a lot to most people.


Don't forget to join us at:
for exclusive stamps, freebies, games, live tutorials
and lots more fun! 

Thank you so much for stopping by.

Katya Bess

Sunday, September 29, 2019

7 Kids Crafts: Spread a Little Holiday Cheer

Hello Everyone!


I hope you all are having a great day. For this card I mixed some digi, clear and rubber stamps. First I printed Emaline's gift (Sweet November vault digi stamp) on Kraft Cardstock because I find it easy to color with my Polychromos pencils.  I also printed another one of her the same size on basic printer paper so I can create a mask.

After fussy cutting that mask I used some daubers to color in the background with Distress Oxides and the snow at the ground was with ColorBox Frost White. You can probably hit that with the heat gun but because of my erratic schedules I just set it aside and worked on it the very next day. All of the inks were completely dry, and I felt it needed a little more of something.

I realized that I had purchased this Snowy Afternoon Flakes stamp by Studio Light from the 7 Kids Crafts. I was afraid that I wouldn't get a good impression but the impression was pretty good. I stamped it with  StazOn Pigment Snowflake. I did mess up on my card though. LOL I'll show you my practice paper so you can see how good it stamped on the very first try and then I'll explain what I did wrong on my final card. Hopefully you won't make the same mistake as me or if you do how you can disguise the little accident. (My kids say "Happy little Oops" that they learned from their art teacher or maybe it's a "Happy Little Accident" as Bob Ross would say. haha 


Yes, I keep pieces of scratch cardstock and reuse them because I don't like to waste my  paper...
Can you see? That was just one stamp and I didn't have to condition the stamp at all. The paper was nice and flat but on my card I had a slight shift on the snowflakes because my paper was slightly curved and I should have used a washi tape to hold it down. The stamp is large and covers about
5.5 x5.5 so I couldn't use a magnet on the top of the card. So my suggestion is to use washi tape
but as I mentioned before I failed to do that part. 


Here you can see that I was trying to hold it down as I was trying to put the stamp press on it
and it's where I should have used the washi tape instead. 
I didn't mention that I did cut a piece of paper
to a rounded shape so I can cover the face. I know snow goes everywhere but because I put so much emphasis on her little facial features I didn't want to cover them up with snowflakes. 

To try to fix my error I tried to use a Sakura Gellyroll Clear star to hide some of the flaws in the snowflakes that I messed up on. It's not too noticeable now. The sentiment stamp is from The Greeting Farm, and the cursive writing I wrote myself because I felt there was too much negative space. 


Anyway, that was too much rambling on my behalf. I hope you learned something and I hope you like the card even though there are human errors on it. LOL  

Thank you so much for stopping by, in a couple of days Sweet November Stamps will have a brand new release. All I can say is that is Halloween-ish. heehee

Don't forget to check out the rest of the 
Design Team's cards and live videos


Thank you,

Katya Bess 


Wednesday, September 25, 2019

7 Kids Crafts: Happy Birthday

Hello Everyone!

Just wanted to share my latest birthday card. I haven't made too many 6x6 cards this year but I wanted to add lots of birthday balloons to make the card look more festive. (the balloon dies are from a CC Designs that I purchased a long time ago and name is not on the insert) The Happy Birthday die and the stamp are both from The Greeting Farm. You can find the clear stamps from the Miss Anya Samoyed set here. The birthday die cut I used is Happy Birthday and I loved it because it was smooth cut without me having to trim off edges or fussy around with it and it's also on a good deal. The fun papers are from Doodlebug 6x6 pads: Fairy Tales and the other one is called dot-grid-daisy-strope rainbow petite prints


I colored the image with copic markers and stamped
the dress and bow on one of the Doodlebug 6x6 papers: Fairy Tales pad
because I thought it was a cute and festive for a party or birthday dress. 

Don't forget to join us at:
for exclusive stamps, freebies, games, live tutorials
and lots more fun! 

Thank you for stopping by.

Katya Bess


Sunday, September 22, 2019

7 Kids Crafts: Boo is Helping out

Hello Everyone!

I know it has been a while since I posted. I'm hoping that in the next few days I can catch up and post a few more cards or Artist Trading Cards for you all to see.

For this card I wanted to do a big mash up of images from Sweet November Stamps. I used a mermaid called Treasure (I believe she was a vault image), I cropped her and I drew a long skirt and for her arms and torso I just colored it both dark gray and black to give her that corset look with a long sleeve shirt. I used Free Witches Hat (literally it's currently free $0.00), I used Boo's Pumpkin and Tabitha (which comes in a set.)

Treasure (vault image)

I colored everything with Copic markers except the "gold metallic marker pen"

Here's a little background on Boo's Pumpkin: "This darling little specter can be found haunting the pumpkin patch every October night leading up to Halloween. He is searching for only the biggest and best pumpkins out there because those special gourds make for ideal jack o'lantern carving."

When I first saw Boo, I knew I wanted to put him in a scene helping out mom. I didn't want him to actually be a ghost but to be dressed up as one for Halloween. I chose Treasure to be the Mom because she looks as if she's ready to catch the big pumpkin, as Boo is bringing it to the front door. I also loved the way her hair is flowing and you can tell it's a windy autumn day. I used my own door as reference (it's actually not wood nor that color lol) but I wanted an open door. Then I added a brick siding in various Yellow-Reds and Earth tones.  Oh yea, I colored little curious Tabitha as a black tuxedo kitten sneaking next to Treasure to see what is going on. I hope you enjoy this card as much as I enjoyed creating it.


Here are some of the Copic markers I used:
E00, E11, R20, 
Hair: C9, C7, YG07, YG67 
Eyes: YG07, YG67
Lipstick: RV19, RV99
Outfit: FV2, BV17, T6, T8
Kitten: C7, C5, C4
Ghost: C1, C0, RV00
Bricks: E97, E99, E04 
Wood: E17, E59, E18
Pumpkin: YR04, YR24
Metal accessories and hardware: Gold Metallic Craftwork Pen 

Don't forget to join us at:
for exclusive stamps, freebies, games, live tutorials
and lots more fun! 

Thank you for stopping by.

Katya Bess

Entering card at:

https://cccdigicreations.blogspot.com/2019/09/challenge-107-for-child.html

Sunday, September 8, 2019

7 Kids Crafts: Rowena

Hello Everyone!


I hope you've been having fun with these little Wee images. For today's card I'm showing Witchwee Rowena you can get her in a bundle here: Bundle Rowena, Tabitha, Jack O'Lantern and Half Moon

Here's a little background on Rowena and friends by Amy Young:

Rowena loves to spend crisp autumn nights snuggled up against her black cat familiar, Tabitha. Together they enjoy the glow and warmth of a happy jack o'lantern as they dream beneath a harvest moon.

I wanted to give her green skin because I had The Wizard of Oz on my mind. This could be before The Wicked Witch of the West became so mean. LOL Also, with the green skin I hope I didn't make her look so much like Yoda, because I kept thinking of him too. haha The sentiment is from a retired Kraftin' Kimmie stamp set that I thought went perfectly with her demeanor. I did a combination of marker and pencil. For a the base layer I color her skin, the pumpkin and the sky in Spectrum Noir, the I colored with Polychromos pencils on Kraft Cardstock. For the Skirt I first colored in dark blue and then I used a color shift paint that goes from purple to blue. I wanted to set her in a pumpkin patch... and most pumpkin patches that I've been to have hay all over the ground.


I love that she looks relaxed and unbothered at all. 

Polychromos:
Permanent Green, Deep Cobalt Green, Black, Rose Carmine,
White, Black, Burnt Umber, Burnt Siena, 
Burnt Ochre, Brown Ochre

Thank you so much for visiting. 

Katya Bess