Showing posts with label TTPH DT. Show all posts

Tuesday, November 18, 2014

TTPH DT: Thankful with TSC

Hey Everyone!

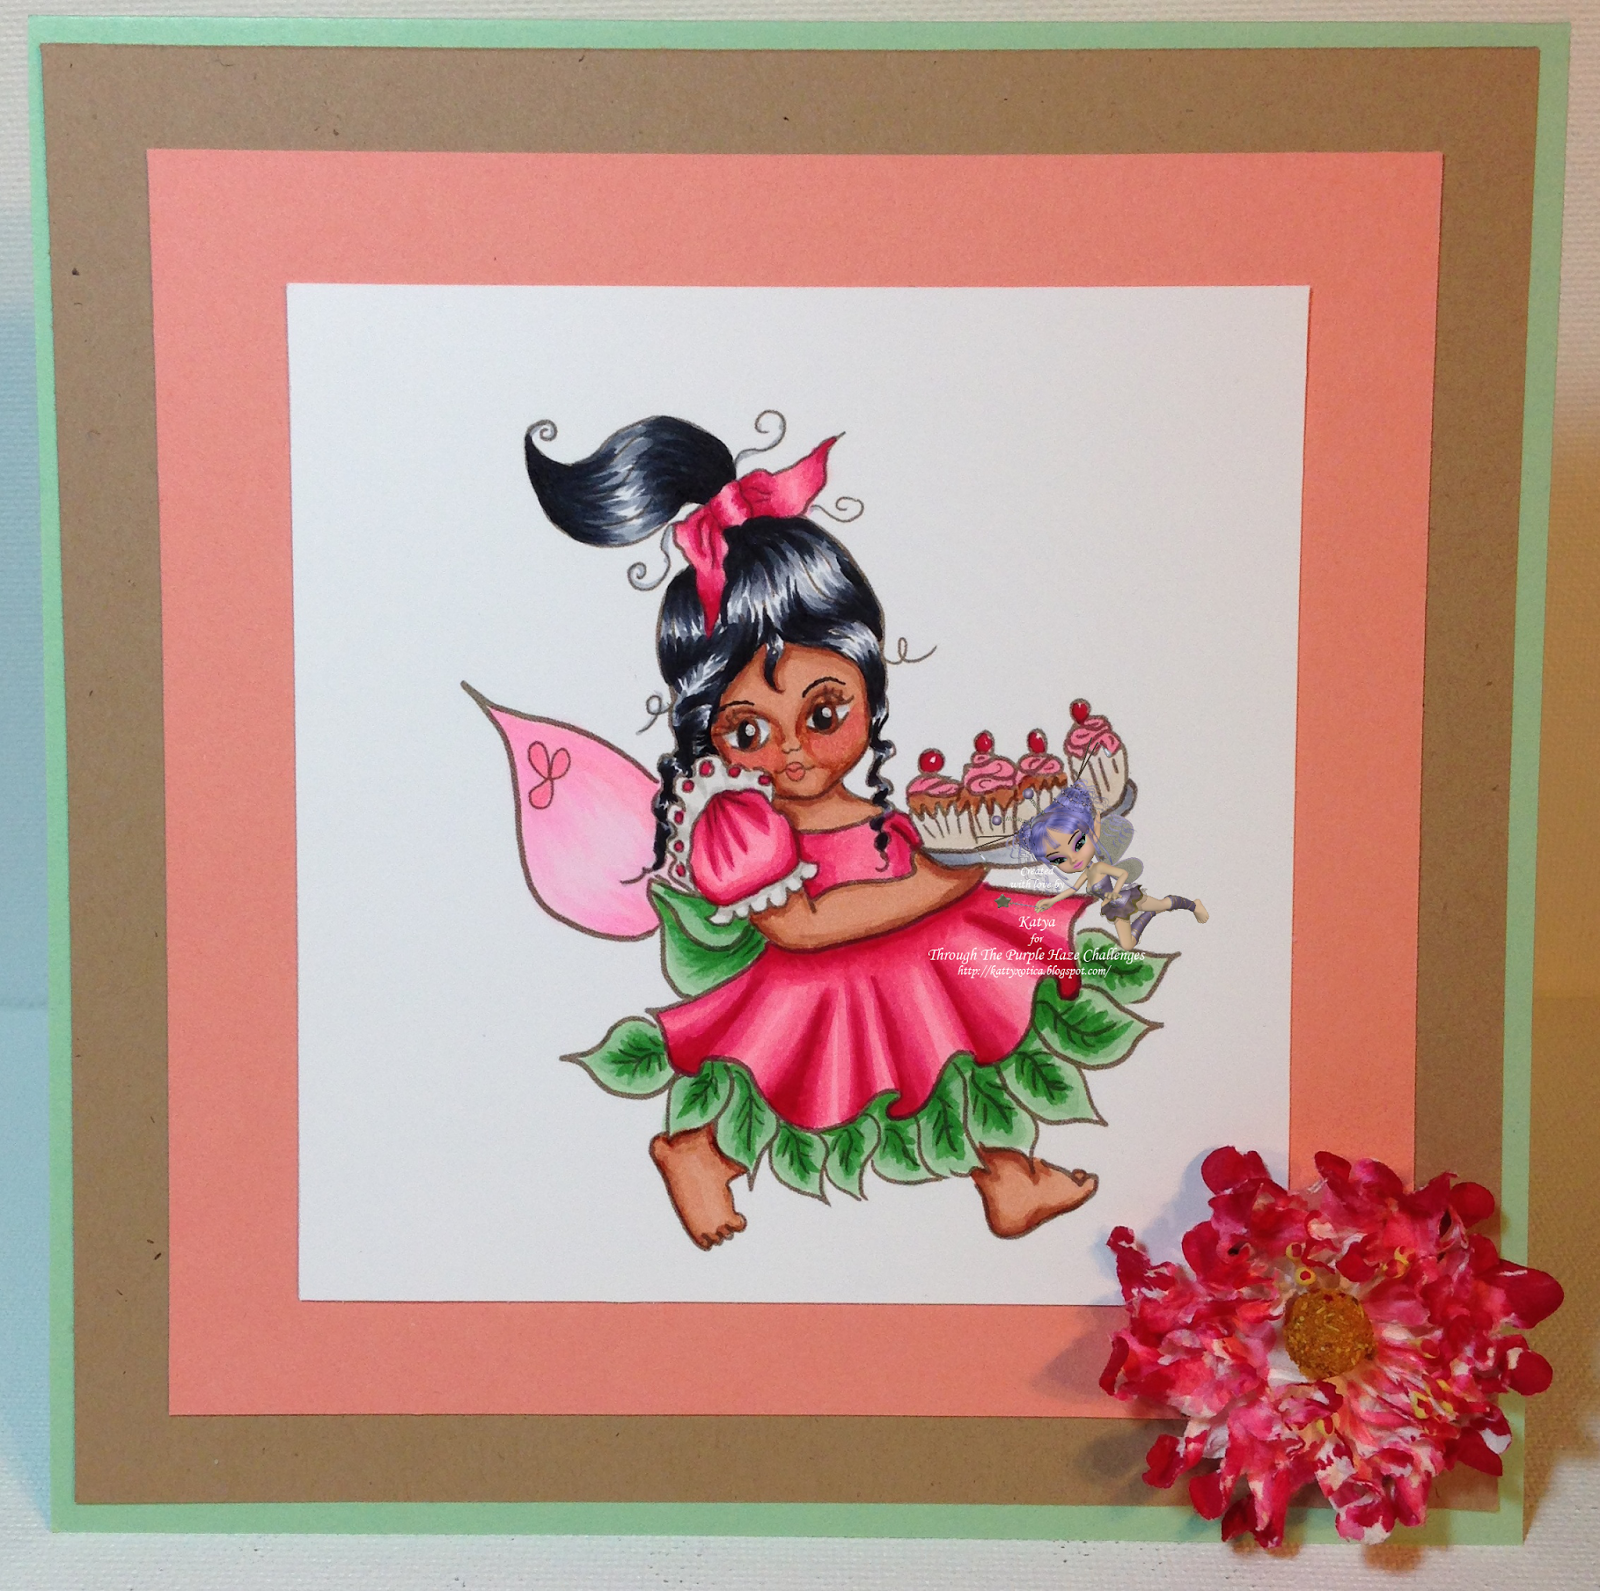
Just a quick post to show my card for Through The Purple Haze DT. This week we are being sponsored by The Stamping Chef and I'm using an image I bought a whiiiiile back she's called
Leg or Breast? It's on sale for $1.50 since The Stamping Chef also has a monthly challenge on their Facebook fan page. The TSC monthly theme is "Thanks" and the Recipe is Ribbon and Kraft card AND use the 'Leg or Breast?' image. Here's the link: https://www.facebook.com/groups/TSCRecipes/  The image is very sexy. I had a different idea on how I wanted to use her but I went a little mainstream and just made it a 'Thank you' card instead.

So here's my card:

I colored with Copics... and since I was doing Native American skin I tried out different colors
didn't even write them down since I have a tough time blending. I seriously need to practice with more colors. I have like 3-4 combos down and that's what I stick to. LOL 
I Also did some experimenting. I tried to mask the image 
but the black ink started to bleed and paranoia kicked.... argggg! 
When I removed it it wasn't as bad as it looked but still a little bit got messed up.

I used this paper stack I bought like 2 years ago I think. It's called Garden Harvest by Recollections. 
It's Kraft paper mixed with glitter! Well most of the pages anyway. It's cute. 

The 'thanks' die is from the Happy Thoughts Stamp set at

Thank you for visiting. 

Katya Bess

entering my card at:


Monday, October 20, 2014

TTPH DT: Warm Hugs

Hello Everyone!

Today it's the 64th Challenge over at Through The Purple Haze Challenge Blog.

This week we are being sponsored by Aurora Wings and I got to color We Love Snowman.
(click on the name of the digi to take you to the Etsy Store)
Thank you Mitzi for sponsoring us this week. Your images are always fun to color :)


Here is my completed card.

 I colored it with Copic markers.
I used Sakura Gelly Roll and Stickles to add glitter and sparkle 
to random areas of snow or snowflakes.
The snowflake die is from The Greeting Farm.
The circle I traced the inner part of my Spellbinders die so it 
wouldn't cover up the design of the My Creative Time wavy circle die.
The fancy label is from Spellbinders as well.
 I love those little kittens giving the snowmen warm fuzzy hugs lol!
It was fun trying to add a little fur on them. 
The small snowflakes are from a Martha Stewart punch.


I hope that you are able to play in our 64th challenge called 

I hope you liked my card. 

Thank you so much for visiting. 

Katya Bess


I will be entering my card here:
http://christmascardchallenges.blogspot.com/2014/10/challenge-47-inspiration-photo.html
click on link to see their photo inspiration.

Monday, October 6, 2014

TTHP DT: Stitchy Bear wood eld snow globe

Hello Everyone!


Hope you're having a happy Monday. Today I'm showcasing a shaped card for TTPH's 62nd Blog Challenge. WOW!


I been pretty busy but still trying to cut in some time for crafting... literally... I'll explain. Ha!


So since I've been a little under the weather and not enough hours to complete certain tasks I've been trying to find ways to cut in some time. So I didn't have time to set up my Cricut... cause it's boxed for the moment and I put away my Silhouette wires. My hubby and I have been moving things around the house and getting rid of stuff.... don't worry my crafty stuff isn't going anywhere. LOL So besides that I was low on time and that I'm a little bit lazy at times.... I decided to hand cut my snow globe card. Yup, I centered my largest circle Spellbinder on an A2 card and traced lightly with a pencil on the outer part. For my image I lightly as well traced but on the inner part of the circle without tracing over the feet. For the blue layer I actually used my Cuttlebug because I already had it next to my desk and I still needed an in between layer. For the Snowflakes I used two Martha Stewart punches that came as set and I rarely use them as corner punch or a border punch. I always use them solely for the snowflakes what a shame right? LOL So that was it and it didn't take long. What took longer was trying to make a nice bow... which I still feel that I failed miserably. I'm not used to working with that type of ribbon- it's a little harder to manipulate and it's a little thicker than I'm used to.


Okay so enough chatter... Here is my card.


I colored the image with Copic markers. 
I lightly used some drying Colorbox inks to shade around the edges
then I added dots light dots to the background and drew in some snow mounds.


I colored in some white snow with my Sharpie extra fine point paint pen for white snow
and with my Sakura gellyroll for the shimmer

Wasn't too bad and it didn't take me too long. 
The longest part was the coloring and then trying to fix the box.

Well, I hope you can join us this week at
Make a shaped card and make sure that you're only entering to 10 challenges for your card to be considered for a prize. 

Thank you to Stitchy Bear Stamps 
for sponsoring our DT this week. :)

Thank you for visiting.


Katya Bess


I'll be entering my card at:

Monday, September 15, 2014

TTPH DT: Kenny K Teacher Card

Hello Crafty Peeps!


Trying to unwind from a crazy week.... still have loads to do but still grateful for everything.

This week at Through The Purple Haze Challenges blog is ANYTHING GOES with an option to use Wood or Chipboard and our Sponsor this week is Kenny K Woohoo!

So I was assigned this image called Sexy Teacher. The image is super cute but I don't know any sexy teachers LOL and if I did I would feel weird giving them a sexy card. LOL So I hope I don't offend Kenny him in anyway but I had to add a paper skirt on top of the image so I am able to USE this card for my son's Kindergarten teacher. She wears big colorful skirts all of the time. I showed my son my card and he told me, "I told you my teacher loves purple!" LOL I said, "Well you can make her a card using lots of purple." LOL I was asking if he liked it and what he thought but I guess he TOLD ME.... Ha! Anyway on to my card.


Okay, I do NOT have chipboard and the wood veneer that I do have are bikes. LOL It was 
an optional twist. I used paper with pencils.... but I hope you like it anyway.
 I colored my Teacher with Copic Markers
The papers are from Me & My Big Ideas and it's called Off To School.
The dies and sentiment stamps are from My Creative Time.

That's all folks!
Make sure you join Team B this week at 
TTPH by linking some cards. 
Make sure that if you want to be counted for the drawing for the prize that you only have 10 entries ladies and gents. 

Thank you for visiting,

Katya Bess


I will be entering this card at.
http://craftingfromtheheartchallengeblog.blogspot.com/
Anything Goes

Monday, September 1, 2014

TTPH DT: Fairy in the Wilderness

Hello Everyone!

Hope you ALL are having a great weekend. For everyone here in the USA, Happy Labor Day

My husband and I are on a mini getaway in Mammoth Lakes, CA just past Yosemite National Forest. We are here for a our friends Matt and Farm's wedding. It's so beautiful here.  Hubby forgot his laptop  so I can't upload any of those pictures yet. LOL

So this week we are showcasing images from Whoopsi Daisy. Mine is a little fairy girl with cupcakes.


I used all Copic markers to color my image.
Sometimes CAS is a little challenging for me but I gave it a go anyway with a card sketch I found online. I hope you like it.

Make sure to follow TTPH's Challenge  #57 this week. The theme is ANYTHING GOES. Again our sponsor is Whoopsidaisy Digis. Have fun :) 

Thanks for visiting,

Katya Bess

Monday, August 4, 2014

TTPH DT: Sweet Summer with SSD Smurfette

Hello Everyone!

Hope everything is great.

Today I'm worked on a card from Sassy Studio Designs the digi name is Smurfette.

Thank you Sassy Studio Designs 
for sponsoring us this week at TTPH :) 

 I colored her up with Copic markers only and the background was drawn freehand 
with my Copic multiliner. I made the flowers myself using a spellbinder's die.


Hope you like it. 
Make sure to enter your cards at

Thanks for stopping by,

Katya Bess

Entering my card at:

Monday, July 28, 2014

TTPH DT: Japanese Oiran in Kimono

Hello Everyone!

I been finally doing summer activities with my family and unfortunately it has put some of my crafting to the back burner LOL but no worries I'm still trying to do a bit here and there... hopefully when my kids' summer vacation is over I get a little more time to do crafty stuff if homework doesn't suck up my time. :P


Okay so I was asked to make a card with an Aurora Wings image and of course I said YES because I love her drawings/paintings they are just gorgeous detailed works of art. So when I received the image I was like whoa whoa whoa that's a lot of work to color. LOL Either way coloring puts me at ease and it's quite relaxing the only thing is what colors to choose to give it the look it deserves.... Another thing is I know I didn't give it justice. I will have to make another card with this image again in totally different colors... well I might keep the peonies the same color lol. OH YEA so... well... what happen was.... I thought those purple flowers were AFRICAN LILIES lol they are so not that! They are actually SPIDER LILIES... whoops. I should have looked at the name of the image first right?

Well here you go... I'm showcasing Japanese Oiran in Kimono Spider Lily) (just click the link and it'll take you right to Aurora Wings Etsy shop.)


This is a 6x6 card and I printed two of these images on a 8.5x11 Spectrum Noir Premium cardstock. Oh yea on the Landscape side so I can make sure the height would fit a 6x6 card and be able to be matted. So it's 5x 5 3/4. As minimal decoration I wanted the side panels to be gold.
I left most of her face white so it looks like white makeup then I use a tiny bit of C3 for the darker areas then used C1 for the lighter areas then went in with "0" the Colorless Blender to make it lighter since I don't have anything lighter than C1 in those tones. Then I added some pink/reddish make up and of course colored the lips red trying to be very careful not to go into the white areas.
Probably the easier parts to color were the peonies and were my favorites to colors :)


I colored my entire image with Copic markers. I chose lucky red for the Kimono... it's just the color that first came to mind and I'm even sure if the flowers match it but oh well I had fun coloring. :P
The red cardstock base is from Recollections and the Gold cardstock is from DCWV Metallic Premium Stack. Hope you like my card and hope you are inspired to color one or many of Mizi's beautiful images.  

Thank you so much Mitzi for providing our DT with your beautiful creations. 

Thank you everyone for stopping by.
Katya Bess


Entering my card at:
http://www.craftyourpassionchallenges.blogspot.com/2014/07/challenge-224-flower-power.html
Flower Power

http://thatcraftplaceblog.blogspot.com/2014/07/new-challenge-anything-goes.html
Anything goes

http://craftingattheweekend.blogspot.co.uk/2014/07/challenge-4.html
Anything Goes

http://simplylessismoore.blogspot.com/2014/07/week-182-anything-goes.html
Less is more

http://sisteractcardchallenge.blogspot.com/2014/07/challenge-67.html
Anything Goes

Monday, July 21, 2014

TTPH DT: Theme Distressed

Hi Everyone!

Hope hopefully you all had a great weekend! I didn't do much this weekend but I did get a date night when the hubby- and I had loads of fun. :)

Okay so This is my very first project as DT member at http://throughthepurplehazechallenges.blogspot.com/ I saw an announcement on Facebook that they needed some design team members and decided to give it a shot at least for now. So far I have seen that the ladies are so much fun and all so very supportive.

Delicious Doodles is the sponsor this week and I'm using the image Blossoms (just click on the link and it'll take you right to the shop.)
Thank you so much Teri Sherman for sponsoring our DT group your images are beautiful. 

 I colored my image with Copic markers and some areas with my Sakura Pigma Sensei pens.
I tore the edges for (distressing) then I used Distress Inks.

 I fussy cut extra blossoms and butterflies then embossed them with my stylus to get the 3D effect on the card.

I hope you liked my card.
I also made my first card share on YouTube.
there you can see the card in better detail. 

by the way there are several challenges going on at 
for the blog's birthday. Make sure to check those out as well. 
Thanks for stopping by,

Katya Bess

I entered my card at: