Showing posts with label Little Miss Muffet Stamps. Show all posts

Saturday, January 19, 2019

7 Kids Crafts: Princess Ilyse

Hello Everyone,

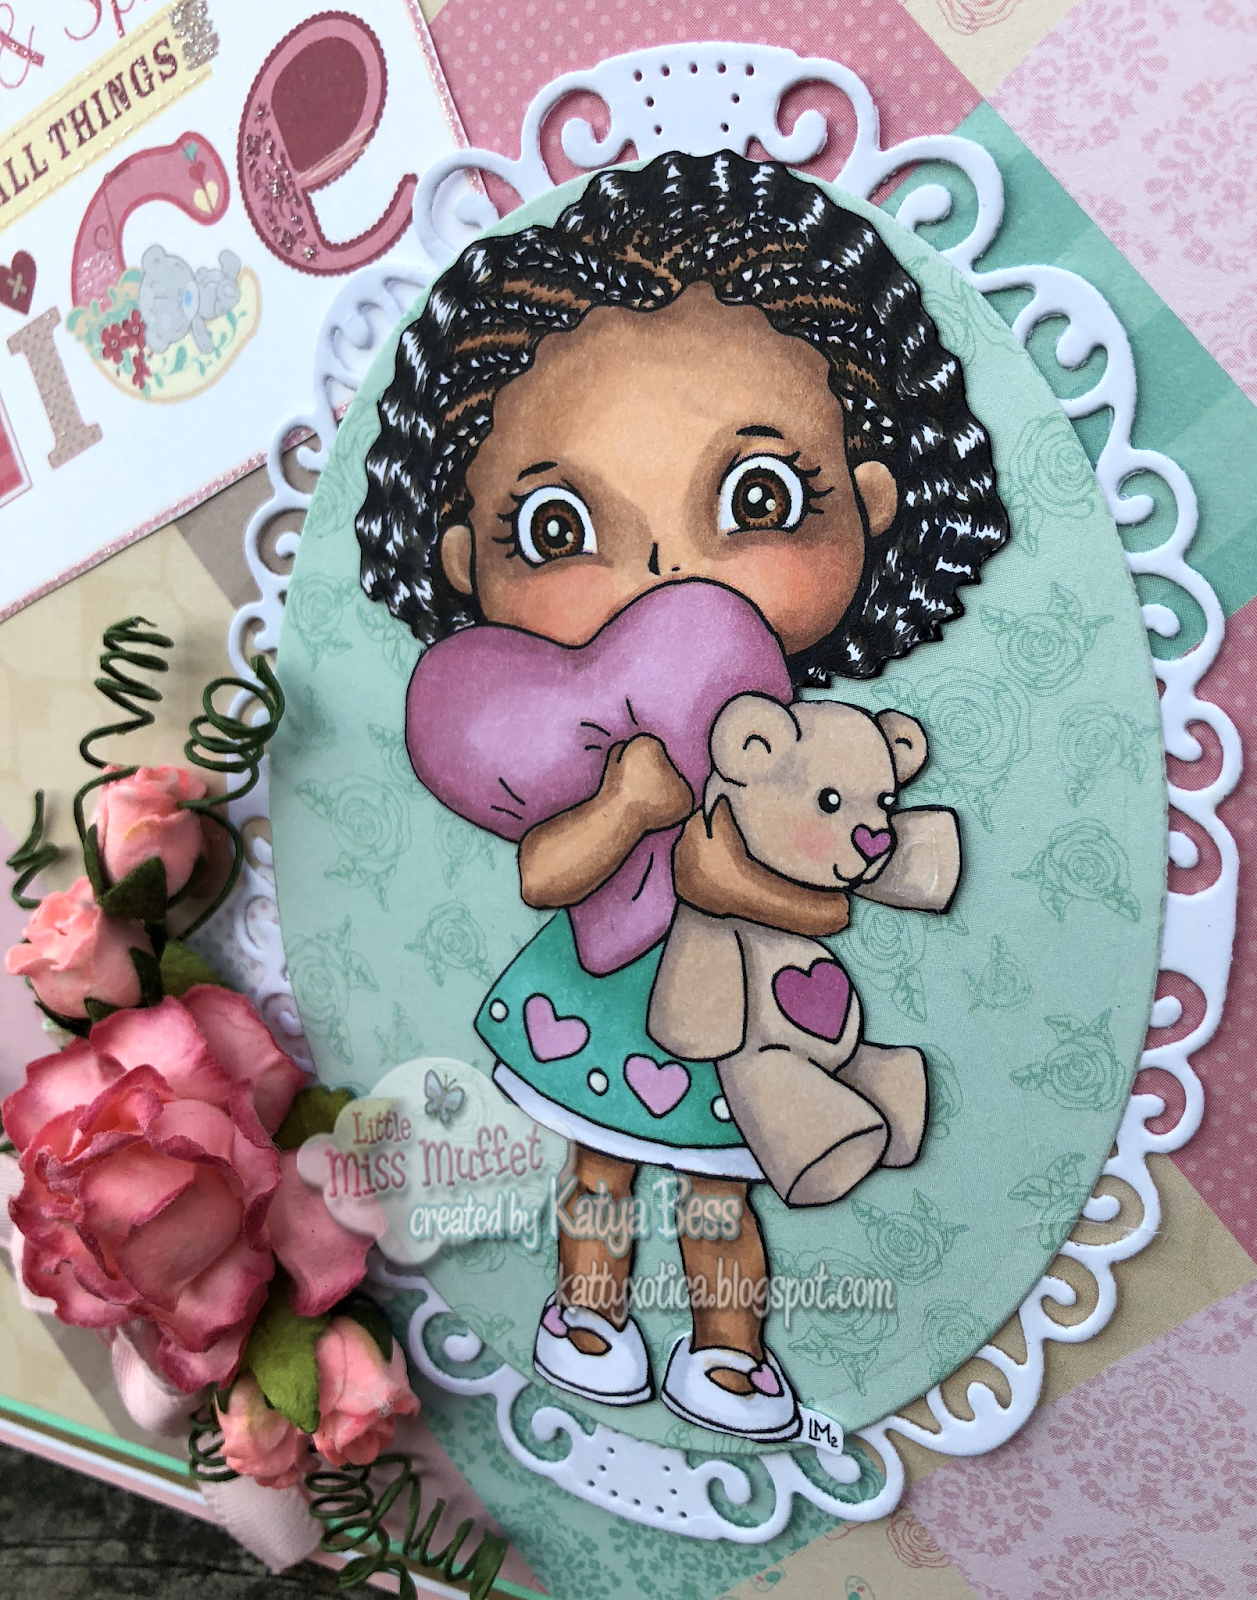
I hope you are having a beautiful day (despite the weather.) Today I'm featuring a digital stamp by Sweet November called Princess Ilyse. Currently this stamp is only available in digital and only at http://www.7kidscrafts.com/

I colored her up with Copic Markers and 1 Spectrum Noir:
E0000, E00, E11, R20, R30, E33
YG63,  Y08, W3
YR23, YR27, E09, E18
Y21, Y23, Y26, Y28
RV63, RV55, RV69
YG17, YG63,  YG67, YG97
B02, B4 (+ Spectrum Noir IB2 for first layer)
R05, YR27

Here's a close-up

I added dots with the Uni-ball Signo Angelic White pen
and the Spectrum noir Sparkle pen to create a sparkling water

Here is one of my red combinations
I was going for that Sansa Stark red hair
because this princess sort of reminds me of her,
well before she married Joffrey "Baratheon" heehee

Instead of using a masking paper
only because this is really not a wet technique
I just used a piece of a printer paper to trace
along her hair and then stamped the Make It Crafty
"Rose Garden" rubber stamp from
Make It Crafty - Rose Garden
I stamped it twice and as you can see I
missed a spot but it's not the main focus
(I let it go and just colored more green in that spot)


Here are most of the markers I used
and right before I discovered that my paper was wonky so I had to 
crop the image down a bit. 


The background is a rubber stamp from 
Make It Crafty called 

I printed the Princess Ilyse digital stamp first.
I made sure to not have her exactly in the center
so I could have space for the sentiment.
I also wanted to place Princess Ilyse so she 
could direct her gaze towards sentiment.

I really loved this sentiment:
"Take time to do what makes your soul happy... 
You deserve it!"
Those are actually two stamps from 

for the water I used a Uni-ball Signo White Angelic pen
and then I used a Spectrum Noir Glitter Pen 

Don't forget that January's Vendor at
7 Kids Crafts are the Santoro Gorjuss Girl stamps
Kelly carries the larger sets as well as the mini sets.

Check out the Facebook group at:
7 KIDS Customers Create!

Thank you for stopping by

Katya Bess


Wednesday, January 9, 2019

LMMS: Get Well Soon PDP Estrella

Hello Crafty Friends, 

Today I have a card for a family member that has been having some health issues for some time, and sadly she's  currently back at the hospital. I want to give her something to cheer her up and that is allowed in hospital without taking up too much space or denied such as flowers. I wanted to make it very colorful but also wanted to make it somewhat simpler than my usual cards. I used Polka Dot Pals Estrella along with a face from the Polka Dot Pals Add-on Faces set.


Copic colors used:
E21, E11, E13, R22, R30
E11, E84, W3
E49, E19
R14, R17 BG15, BG18, Y15, Y26
W3, W00

The pattern paper is from 
Doodlebug Designs Inc: Cream & Sugar
All of the dies are from My Creative Time


For more coloring inspiration check out


also add your creations at


Thank you so much for stopping by.

Katya Bess

Monday, January 7, 2019

LMMS: I'm Shearly Sorry

Hello there Crafty Friends!

Llama tell you I had lots of fun coloring this stamp. heehee These are actually two stamps merged together the one on the back is called Lallana Llama and the one in the front is called Lukeelu Alpaca. Both digital stamps along with the sentiment can be found in the Little Miss Muffet Stamps online store. I was totally inspired by Annabel Haines' work, she puts in a lot of pencil details and I'm always impressed by every card she makes.

&


For the background I used
Distress Oxide: 
Broken China
(for the sky)
Distress Ink:
Mowed lawn 
(for the grass)

Polychromos color pencils used are
Fur/Wool: 
White, Black, Ivory, Burnt Sienna, Walnut Brown, Bistre and Permanent Carmine
Colorful Textile:
Cadmium Yellow, Cadmium Orange, Fuchsia, Crimson, Light Phthalo Green, Indanthrene Blue,
Permanent Carmine, Deep Red, White, Cobalt Turquoise and Ultramarine
Grass Detail:
Olive Green Yellowish and Hookers Green


For more inspiration you can check out
and 

Thank you for stopping by.

Katya Bess

Thursday, November 29, 2018

LMMS: Neva Jingle all the way

Good morning!

I hope you're all in good spirits. Today I have a jolly little card I've created with non-traditional Christmas colors. I used a rubber stamp and a clear stamp set from Little Miss Muffet Stamps. This rubber stamp is called Polka Dot Pals Neva and the clear stamp set is called Polka Dot Pals Add-on Faces
             Polka Dot Pals Add-on Faces              

Some of the Copic markers I used:
Outfit-
RV52, RV55, RV34
YG05, YG09, G16
BG45, BG49, BG78

Present-
Y08 and Y35
Y17, R29 and R24

Jingle bells
Y08, Y35 and a tiny bit of Y26

The die is from 
called Merry Christmas Ribbon (Elites)

The paper if from Doodlebug Design and it's called 
Christmas Town
The stars which are from the Doodlebug Design Chit Chat
also from Christmas Town and I added glossy accents for extra dimension.

That is all for now.


Thank you for stopping by

Katya Bess 

Thursday, November 15, 2018

LMMS: Starbrite bookmark

Hello Crafty Friends,

Today I have a project for the new challenge over at Little Miss Muffet Stamps, I created a bookmark for my littlest one. Daenerys, will be 6 years next week and she's having so much fun learning and reading new words. It may be a while for her to read chapter books but she's extremely advanced and smart that I'm sure she'll be wanting more bookmarks made to read between school books and personal books. For the bookmark I used Polka Dot Pals Starbright. I colored her up with Copic markers and the blue part of the sky closest to her body is with Copic markers as well. The rest of the background was done with Distress Inks. The stars and dots were done with Sakura Stardust Gellyroll and the white stars were done with Uni-ball Sign White Angelic. 


I wanted to make her clothing very girly and colorful.
Luckily I had a twine/tassel with similar colors. I was looking
for my white and gold and saw this colorful twine and thought it would 
perfect for this bookmark.

Here's a close-up so  you can see a few of the spots with Sakura Gellyroll 
Stardust pen- it does look a little weird on the phone but in person
it looks very sparkly and more uniformed. 

I think what took the longest to color 
was the hair and ruffles. It was actually pretty pretty quick and easy to make.
My older daughter's friends are already asking for bookmarks from the last time I made her 
some bookmarks. 

That is all for now. 
Don't forget to visit the blog at
and you may also check out the Pinterest gallery at

Thank you for stopping by,

Katya Bess

Monday, October 22, 2018

LMMS: Festive Days

Hey Crafty Friends,

I hope you're having a great day! I'm here trying to stay warm and coloring away while I have laundry going... Thanks goodness for automatic washers and dryers. LOL For this week's inspiration card for  Little Miss Muffet Stamps I've created a card using Polka Dot Pals Renata and Polka Dot Faces Add-On Digital.  The background I drew in myself because I wanted to put PDP Renata in a more authentic and traditional setting for the folkloric dress she is wearing. I added more ric rac trim to her dress and there rest of the line work was with a Sakura Pigma Sensei 0.4 pen. The pencils I chose to color this image were all Polychromos.

                                                                   Polka Dot Pals Renata 
                                                        and Polka Dot Faces Add-On Digital.  
                     Last year I created a completely different looks with the same stamps. 
                                           If you'd like to check it out clic this link right here: 
                                       http://kattyxotica.blogspot.com/2017/11/la-catrina.html


Here is just a little Close-up


Don't forget to enter the challenges and 
for more inspiration make sure to go check out 
the rest of the DT work


Thank you for stopping by
Katya Bess


Thursday, August 16, 2018

LMMS: The Bookworm

Hello and Happy Thursday!


For many, school has begun. My kids started the new school year on August 6th. Felt like a really short summer break, especially when I went to school- it didn't start until after Labor Day in September. heehee 
I had started to customize the hair on this cutie from 
http://www.littlemissmuffetstamps.com/ her name is Polka Dot Pals Lirienne - it's a rubber stamp and she's currently on sale! I also used clear stamp Polka Dot Pals Add-on Faces and this set is on sale as well. 


After I inked un my stamp, I carefully tried to remove some of the ink from the hair area.
I wanted the hair area to be light almost like "no-lines coloring," so I can customize and make it 
into curly hair and I tried to not mess with the hair barrettes. 


When I used the clear stamp Polka Dot Pals Add-on Faces I didn't line  up the eye holes like
normally because I wanted her to look like she was actually reading. I wanted her to look like she's looking down at the pages of her book. To do this you just line up the Polka Dot Pals Add-on Faces of your choice slightly above the area you normally would. I then darkened the eyelashes and pupuls with a Black Copic Multiliner pen. (With permission) I customized and worked on squiggly and curly lines following Barbara Sproatmeyer's artist lines. So I tried not to change the hairstyle nor the flow of the hair- I did add some bits of fly-away hairs.

Here is the image before deciding on the color of the book.

Here it is all finished ready to give to my daughter.

Don't forget to join the Facebook page
and check out the other creative teammates and customers on the challenge blog at

Thank you so much for visiting my blog.

Don't forget about the current sale.

I hope you enjoyed the card. 


Until next time,


Katya Bess

Thursday, August 9, 2018

LMMS: Happy Birthday Tabitha

Hello Crafty Friends,

Happy Thursday!

I've been having a little fun coloring this this digi stamp from http://www.littlemissmuffetstamps.com/  called Polka Dot Pals Tabitha and using one of the versatile Polka Dot Pals Add-on Faces clear stamps. Polka Dot Pals Tabitha has this super cute short curly hair and a cute little tutu and she's all ready for a birthday party. As you can see below, I used a lot of colors. I wanted a very colorful and happy card. I chose the colors of her clothing using colors I thought went well with the Doodlebug Design 6x6 papers called Fairy Tales. 


Here is my completed card using 


Here is a close-up


These are the colors I used for the clothing, wings and birthday hat.
I  tend to make swatches next to the image I'm coloring, 
If I don't I usually don't remember what colors I used.

Here is the full list of my Copic colors used. 
Hair: C9, C7 and a tiny bit of E29
Eyes: C1, C3, E27, E17, Y26, E15 Uni-ball Signo Angelic White
Skin: E11, E17, E13, E11, R22 and E04 
Clothing/Wings/Party Hat: BG05, BG07, Y11, Y17, Y35, YR04, 
YR07, YG07, YG17, V20, V22, V15, V25, RV06, RV09
Woooo! That was a lot of colors but I really enjoy coloring so
it doesn't feel like a lot of colors when I'm having a good time doing so...
It just takes a little longer.

Here is the inside which was just fussy cutting part 
of one of the Doodlebug Design paper.


I hope you enjoyed my card. I hope you can check out all of the 
other cards created by all of the lovely and creative ladies over at:
http://littlemissmuffetchallenges.blogspot.com/

or check out the Facebook page:


Katya Bess

Thursday, July 19, 2018

LMMS: Polka Dot Pals Kyree

Hello there!

Here's a cute little image I've colored before, it's Polka Dot Pals Kyree and a Polka Dot Pals Add-On FacesPDP Kyree is so much fun to color especially fun to create a card just for fun and for birthday cards. The sentiment I used is Better Than Ice Cream Sentiment and it's just $1.00 in the http://www.littlemissmuffetstamps.com/ right now.


I colored PDP Kyree with Copic Markers
and the background sky was done with Distress Inks


Here is a little of the process...
I picked out papers from the Recollections paper pad called
Pool-Riffic

Here is are the colors I chose for her outfit
and the ice cream flavors

 These are the colors I chose for the grass.


I hope you liked the card. 

Thank you so much for visiting.


Katya Bess

Thursday, April 5, 2018

LMMS: Polka Dot Pals Febiana

Hello Everyone!

I hope you're having a lovely day. Today I am showcasing a card using Polka Dot Pals Febiana, one of the newest digital stamps from Little Miss Muffet Stamps shop. I also, used one of the faces from Polka Dot Pals Add-on Faces set.

Here is what I've created for this Inspirational Thursday. I had so much fun coloring Polka Dot Pals Febiana I colored Polka Dot Pals Febiana as my interpretation for Storm from X-Men. Storm is very powerful and a leader among her mutant and human peers. Because she is so powerful I decided to add that hashtag #girlpower instead of leaving the card without a sentiment.


Copic colors: 
E13, E17, E27, E29, R35
Y23, Y26, Y28, R30, R46, R39
C9, C7, C5
C3, C1

Copic Multi-liner Black

Prismacolor: 
PC PC1063 and PC938

I colored her up with Copic Markers and to add a few gold details I used the Uni-ball Impact Gold, as well as a little bit of Prismacolor to give her some hair strands to her white hair. For her eyes, I colored over the pupils and added Glossy Accents over the entire iris.


For the background I used Distress Ink Weathered Wood from the center and up, then Evergreen Bough to represent an ocean or large body of water. When I was satisfied with covered I went in with Black Soot on the side edges and the top. 

When I was done adding color to the background, I drew tiny lines with my Uni-ball Signo Angelic white pen going in one direction to represent rain.
 Then I mapped out where I wanted to add lighting bolts from where she is lifted in the air. 

The lightning bolts were too light so I used a white Prismacolor to make them stand out a little more- not quite as white as I had hoped but it was good enough. 

It was a pretty simple card to make, the only thing that took me longer was the coloring because I was experimenting with other colors. 


I hope you are able to join in on the 
Anything Goes Challenge 
and also check out the other fabulous designs from the 
Design Team and Guest Designers.


Thank you for visiting,

Katya Bess 

Thursday, March 22, 2018

LMMS: Vega Rise Above and Shine

Today I'm showcasing a card I using Polka Dot Pals Vega


I used Kraft Cardstock and to start off I used
Copic markers. To brighten up the eyes, background,
star and skin I used a little Prismacolor over the Copic marker.
(Not a good idea to do it the other way around
if you want to keep a good Copic brush any. I Actually purchased a Prismacolor
colorless marker to blend/melt away Prismacolor Pencil wax but I hardly ever use it.)

It's a little hard to see but I added a little bit of Sakura GellyRoll Metallic Gold
to line the inside of the star that PDP Vega is holding. I then added some
Glossy Accents to the star to give it a 
little shine and emphasis to whomever looks at the card in person.
Another part I like to focus on especially with the 
Polka Dot Pal images is the big beautiful eyes. 
I used a White Prismacolor to color the sclera (aka whites of the eyes) 
then go in with the Black Prismacolor pencil to line and highlight
the eyes, eyelashes, and eyebrows. I used a little bit of PC 947
and a little more with PC 945 to define the her facial features such as:
jaw line, chin, sides of cheekbones, hairline, temples, eye crease, sides of nose
and a little for shadowing the ears, hands and legs.
When I was done coloring her face I went in with
Uni-Ball Signo Angelic White pen for the eyelights.

For the background I used Distress Inks:
Evergreen Bough and Black Soot
then I used a PC1011 PDP Vega to illuminate the area around her.

Then I added little stars all around with my Uni-Ball Signo Angelic White pen
when I was done just for a little more interest.

The clear stamp sentiment and square die is from My Creative Time.
The scalloped die is from Craftin' Dessert Divas

Remember to link up your cards or projects over at
The challenges are ALWAYS Anything Goes


Thank you for visiting. 


Katya Bess

Thursday, March 8, 2018

LMMS: Polka Dot Pal Temoc Cheer!

Good morning Everyone!

Welcome back to another Inspiration Thursday! A new challenge starts over at Little Miss Muffet Stamp Challenges. For the next 14th days you can link your creations to the inlinkz list for a chance to win a $10.00 gift voucher to the Little Miss Muffet Stamp Shop.

Little Miss Muffet Stamps is also holding a Guest Design Team Call for a 6 month term. Just click here for the Guest Designer requirements. Deadline is March 17, 2018.

For today's card I used digi Polka Dot Pal Temoc and combined it with one of the clear stamps from Polka Dot Pals Add-On Faces.
I colored up Polka Dot Pal Temoc with the Golden State Warriors (formerly known as The Oakland Warriors.) Is it bad that I don't know if it's basketball season... Is it? But if it is... Go Warriors!!! LOL I know that it's not football season anymore though. haha I was thinking I should color her as an Oakland Raiderette but maybe next time I use PDP Temoc I will. heehee Some of my friends
might want me to color up a Goldrush Cheerleader. :P


Copic Recipe:
E0000, E000, E21, E11, R21, R30,
E23, E25 +(Uni-ball Signo Angelic)
C9, W7, W5,
B28, B16,
Y19, Y26,
N0, N2

Distress Ink:
Black Soot

Design paper is from Doodlebug Design 
and the rectangle card die is from My Creative Time.


Don't forget to link up your card for the Anything Goes Challenges over at http://littlemissmuffetchallenges.blogspot.com

Thank you for visiting. 

Katya Bess

Thursday, February 22, 2018

LMMS Estrella hugs

Hello Everyone!

I hope you're having a fabulous day! Today I want to share an inspiration card that I created for Little Miss Muffet Stamps. I created this card in honor of African American History month and for the American Heart Awareness Month as well. I hope that you're able to find some inspiration with this card, I have listed the Copic Colors I used below.

The digital stamp from Little Miss Muffet Stamp is called 
and

Here is a little close-up of the image. 

Here is my Copic marker recipe:
E11, E55 and R30 
E99, E33, Muilti-liner Sepia 0.1 and Uni-Ball Signo Angelic
dress: BG32, BG34, BG23
RV11, RV32, RV34 and E04
bear: RV34, R30, E70 and E43
for the hair I used C9, W7 and W5

Spellbinder's Nestabilities dies
Elegant Ovals and the other one is a basic Oval
that I don't remember the name. 
The flowers I purchased from Jamie's Not2ShabbyShop
The paper is from Tiny Tatty Teddy Girl 6x6 Paper pack
 The sentiment also came from the same paper pack.
I home you like this card and hope that you 
got some inspiration from it.


Don't forget to check out the talented ladies over at
and make sure to join in on the challenges

Thank you for stopping by.


Katya Bess

Wednesday, February 7, 2018

LMMS: Colorful Birthday

Hello Everyone!

Today I've worked on a card showing various colors. The day I started coloring this image was a gloomy and rainy day. School for my children is somewhat far away and they have different times they get out of school (a big gap) so I end up having to be in the freeway for extended periods and when it rains it eats up a lot more of my time. That particular day was accidents left and right [sigh.]
At the end of the day I wanted to relax and had time to color and actually had the energy to color. LOL Since the day was all gray and gory I wanted to see many bright and cheery colors- I was inspired by the colorful palette in a Doodlebug Design paper pad. I don't have the cover so I don't know the name for the main papers I used. The "hello birthday girl" sentiment is also from Doodlebug Design but it was a different paper pad called Fairy Tales. The banner die and the rectangle die are both from My Creative Time.


I used Copic markers to color my image.


Here's a close-up of the image.

Thank you for stopping by.


Katya Bess


Thursday, January 25, 2018

LMMS: Ryker Smile

Good Morning!

It's time for a new challenge over at  Little Miss Muffet Challenges and as always it's an Anything Goes Challenge. Here is what I've created using Polka Dot Pal Ryker and one of the faces from Polka Dot Pals Add-on Faces. I always need some male/boy cards and it seems that I don't have one on hand...yikes... trying to get better at that. This image is perfect for different occasions too so I definitely had to color him up. :D

I used Copic markers to color him up. 
I was extremely indecisive on the skin and clothes
for some reason....  Then I decided to go with a 
green even though the background is green and maybe I should of gone with a 
muted red or some type of reddish brown. I don't know maybe I'll do another card.  
I also want to try another card with "mess" with the texture of the hair. 
Back to the green... heehee since I colored his gree and I had already picked and cut
up the paper to make the card I left a white edge when cutting the image.
I typically do not like leaving the white and I didn't like it agains the green
so I glued the image on black cardstock and left an edge around that and to me
it really pops and he doesn't fade into the background.
Oh yea! I almost forgot to mention that the paper is from the Michael's Recollections line.
I bought the big 12x12 when it was on sale I think I paid a little more than $5-tax included.
A couple weeks later I saw the same stack but in the 6x6 pad but I didn't
buy it cause I was trying to quickly buy something else while I was supposed to be
grocery shopping... (shhhh don't tell my husband... or my kids) 
but also the 6x6 paper cost more than the 12x12! What's up with that?
The 6x6 paper cost $5.99 and no good coupons available that week. LOL
Here is a close up. 
I added Glossy Accents (that I did but with a 50% off coupon a different week LOL) 
to the lens to give it that "glass" look and same with the flash.

The "Smile" die and the "polaroid" die with the sentiment are all from My Creative Time.


I hope you liked my card and didn't get bored with my rambling.


Don't forget to check out
for digis, clear and rubber stamps

AND don't also check out the very talented ladies
on the design team and make sure to link up
your creations at:

Thank you for visiting.

Katya Bess